Boat trailer lights are a small system with an outsized job: they keep your trailer legal, visible, and predictable on the road while protecting your boat, tow vehicle, and everyone driving near you. In practical terms, “boat trailer lights” usually means the full lighting and wiring package mounted on the trailer, including tail lights, brake lights, turn signals, side markers, reflectors, the ground path, the vehicle-side connector, and the harness that ties everything together. If one part fails, the entire signaling system can become unreliable. I have inspected hundreds of marine trailers over the years, and lighting faults are among the most common problems owners bring into the yard before launch season, after long storage, or following repeated dunking at the ramp.
This matters because boat trailers operate in harsher conditions than utility trailers. Freshwater already promotes corrosion inside lamp housings, plug terminals, and splices. Saltwater accelerates that damage dramatically, especially where dissimilar metals meet. Add vibration, submerged hot bulbs, cracked lenses, worn grounds, pinched harnesses, and neglected connectors, and even a trailer that looked fine last month can lose a brake light on the highway today. Proper inspection and replacement is not just about swapping a bulb. It is a structured maintenance task that includes diagnosing power, ground, routing, sealing, mounting, and compatibility with the tow vehicle’s connector and fuse protection.
As a hub within Boat Maintenance & Repairs, this guide covers the core of trailer maintenance and towing from the lighting perspective: how to inspect the system, what failures to expect, when to repair versus replace, how LED assemblies differ from incandescent units, how to wire and test common 4-way and 7-way connections, and how to prevent repeat failures. If you maintain your own trailer, these basics save time and roadside frustration. If you hire out trailer service, understanding the process helps you ask better questions and catch incomplete work before a trip.
What to inspect before replacing anything
Start with a full-function test while the trailer is connected to the tow vehicle. Check running lights, left turn, right turn, brake lights, and hazard flashers. If you have reverse lights or electric brakes through a 7-way connector, verify those circuits too. A simple rule helps narrow the fault fast: if multiple lights fail on one side, suspect a ground, harness break, or connector issue before assuming several bulbs died at once. If every trailer light is out, inspect the vehicle fuse, relay, adapter, and trailer plug first. On many late-model trucks and SUVs, trailer tow circuits are separately fused from the vehicle’s own rear lights.
Then inspect the hardware. Look for cracked lenses, water inside housings, white or green corrosion on terminals, loose mounting studs, rubbed insulation where the harness crosses the frame, and Scotchlok-style quick taps that have turned brittle or loose. I replace those taps whenever I see them on a marine trailer because they are a repeat-failure point. Follow the white ground wire closely. A surprising number of trailer light problems come from a rusty frame ground or a ring terminal secured to painted steel. Good marine practice is a dedicated ground wire running to each lamp, not relying on the frame alone as the return path.
You should also confirm submersion rating and lamp type. Many older incandescent lights were labeled for occasional submersion but fail quickly after repeated launch cycles because hot bulbs cool rapidly in water and draw moisture past seals. Modern sealed LED trailer lights handle vibration better, draw less current, and usually outlast incandescent fixtures by a wide margin. That does not mean every LED unit is equal. Choose lights marked for trailer use and submersible service from established brands such as Optronics, Peterson, Truck-Lite, or Wesbar, and match stud spacing, connector style, and legal reflector requirements before ordering parts.
Tools, parts, and a smart replacement plan
You do not need a full electrical shop to service boat trailer lights, but the right tools prevent bad repairs. Keep a digital multimeter, a 12-volt test light, heat-shrink butt connectors with adhesive lining, marine-grade tinned wire, split loom, dielectric grease, stainless mounting hardware where appropriate, and a wire brush for cleaning ground points. A circuit tester for 4-flat and 7-way connectors is also useful, especially when you need to separate trailer faults from vehicle faults quickly. If the harness is brittle along several sections, replacement of the complete harness is usually faster and more reliable than piecemeal splicing.
Plan the job before you cut anything. Determine whether you are replacing one light assembly, one side, or the entire lighting system. On older trailers, mixed-age components create recurring issues: a new left LED lamp wired into a corroded incandescent-era harness often means the light works today but fails after the next launch. In my experience, once corrosion has traveled under insulation or into multiple splices, a complete rewire is the economical choice. It costs more upfront, but it reduces callback repairs, avoids intermittent faults, and gives you a clean baseline for the rest of your trailer maintenance and towing setup.
| Problem observed | Likely cause | Best fix |
|---|---|---|
| All trailer lights out | Blown vehicle fuse, bad adapter, unplugged or corroded connector | Test vehicle socket first, replace fuse or connector as needed |
| One light dim or intermittent | Poor ground, water intrusion, corroded terminal | Clean ground, replace connector, seal with heat-shrink |
| One side completely dead | Broken harness wire or failed side ground | Trace circuit with multimeter, repair harness or run new wire |
| Bulbs fail repeatedly | Incandescent submersion shock or excess vibration | Upgrade to sealed LED light assemblies |
| Lights work on one tow vehicle only | Vehicle-specific fuse, converter, or wiring standard issue | Verify connector type and test tow vehicle output circuit by circuit |
How to inspect wiring, grounds, and connectors correctly
The most efficient inspection sequence is connector, power, ground, then fixture. At the trailer plug, check for bent pins, looseness, oxidation, and missing weather seals. On a 4-way flat connector, the standard color code is white for ground, brown for tail and marker lights, yellow for left turn and brake, and green for right turn and brake. On a 7-way blade setup, color conventions can vary slightly by manufacturer, so confirm with the trailer diagram or tester instead of relying only on memory. Standardization helps, but previous owners and past repairs are often the wildcard.
Testing with a multimeter is straightforward. With the tow vehicle outputs activated, measure voltage at the connector and then at the light end of the circuit. If you have power at the plug but not at the lamp, the fault is in the trailer harness. If you have voltage at the lamp feed and the light still does not work, check the ground side under load. A weak ground can still show continuity but fail when current demand rises. Voltage-drop testing is more revealing than continuity alone. Anything more than a small drop across a ground path tells you corrosion or a poor mechanical connection is adding resistance.
Inspect routing with the same care you give electrical testing. Harnesses should be clipped above the lowest frame points, away from sharp edges, moving suspension parts, bunk brackets, and areas where tie-down straps rub. Where wires pass through crossmembers, use grommets. Where they are exposed, use loom and enough slack for movement without allowing sag. I have seen perfectly good rewiring jobs destroyed because the installer zip-tied the harness tightly to a galvanized edge without abrasion protection. Six months later, the insulation wore through and took out the marker circuit every time the trailer flexed over a driveway apron.
Replacing light assemblies and bulbs the right way
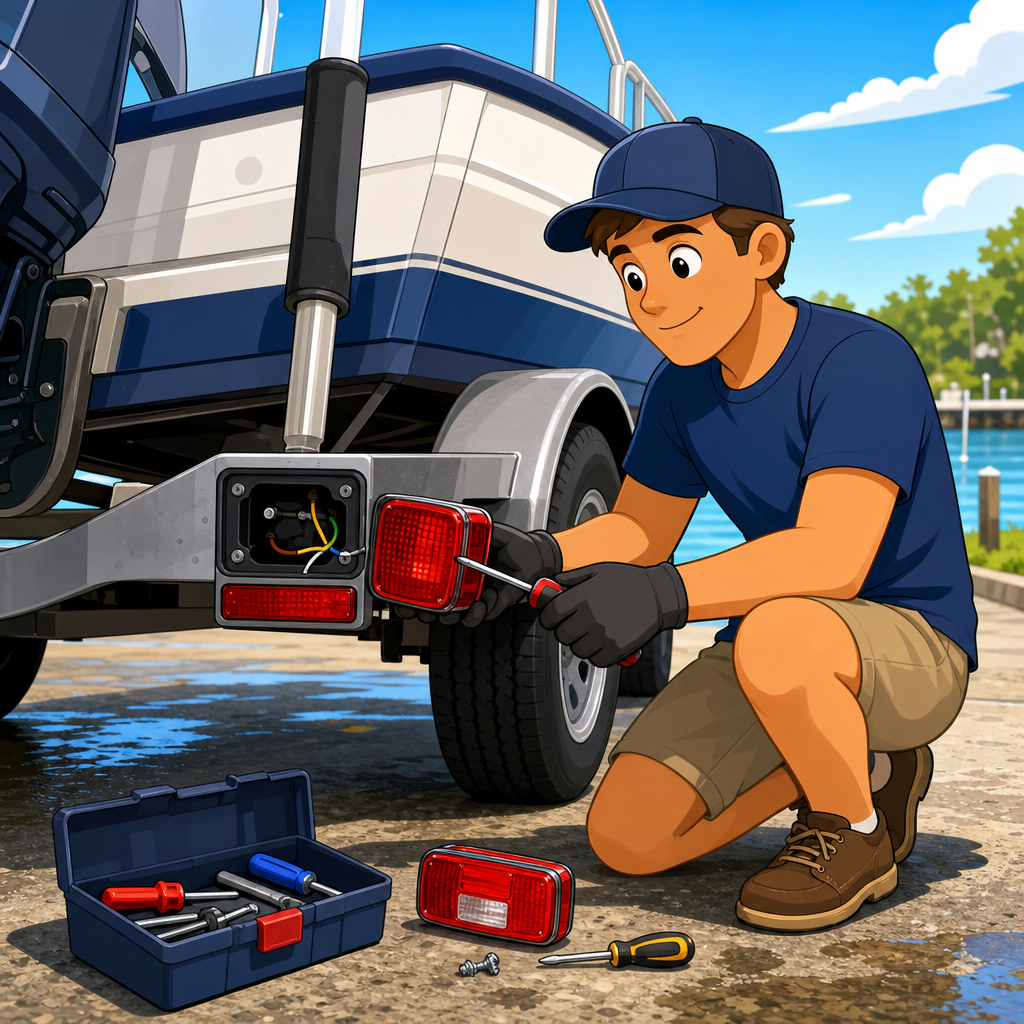
If the housing is cracked, full of water, or visibly corroded, replace the complete light assembly rather than only the bulb. For boat trailers, sealed LED assemblies are the default recommendation unless you are maintaining a period-correct restoration. They are brighter, more shock-resistant, and less vulnerable to moisture damage because there is no replaceable filament bulb and no need to open the housing for routine service. They also reduce current draw, which helps when your tow vehicle has long wiring runs, adapter connections, or marginal voltage at idle with multiple loads active.
Removal is usually simple: disconnect the trailer plug, unbolt the light, cut back any corroded wire until bright clean copper appears, and strip only enough insulation for the new connector. Use adhesive-lined heat-shrink butt connectors and a proper ratcheting crimper. After crimping, apply heat evenly until the connector seals and adhesive flows at the ends. Do not twist wires together and cover them with household electrical tape. That repair may survive one dry weekend, but it will not survive a season of launching, towing vibration, and spray. If the lamp grounds through its mounting studs, clean the metal contact area thoroughly before reinstalling.
Bulb replacement still applies to many older trailers, and when that is the task, replace in pairs and inspect the socket closely. A fresh bulb in a pitted socket often works only until the next bump or the next splash at the ramp. Use the correct bulb number and verify dual-filament versus single-filament configuration. A common mistake is installing the wrong bulb base or forcing a mismatched lamp, which can produce incorrect function or short the socket. If the socket shows green corrosion, loose contacts, or heat damage, replace the whole assembly instead of trying to rescue it.
Complete rewiring, upgrades, and towing reliability
A full rewire is the best option when the trailer has multiple splices, intermittent faults, or years of corrosion. Most rewiring kits include a wishbone harness that splits tail and marker circuits to each side, reducing mid-trailer splices. That layout is especially useful on boat trailers because each additional splice is another potential water entry point. Run a dedicated ground to each lamp and marker, secure the harness with cushioned clamps, and leave service loops only where future maintenance may be required. On galvanized frames, avoid drilling unnecessary holes that compromise coatings; use existing points and approved clamp methods where possible.
While you are rewiring, think beyond the rear lamps. Side markers, license plate lights, and conspicuity matter during night towing and poor weather. Federal lighting requirements depend on trailer width and configuration, but most recreational boat owners benefit from treating visibility as a safety baseline rather than a minimum compliance exercise. If your trailer regularly travels before dawn to beat ramp traffic, brighter and properly positioned marker lights make lane changes and backing maneuvers safer. I also recommend replacing tired plug ends during a rewire because the connector is a high-stress item that sees flexing, contamination, and frequent handling.
Reliable trailer maintenance and towing also includes preventing future light failures through procedure. Unplug the trailer connector before backing into the water if your setup and local practice allow it, especially on older incandescent systems. Rinse the trailer thoroughly after saltwater use, paying attention to connectors, mounting hardware, and frame channels that trap brine. During off-season storage, keep the plug off the ground and protected from UV exposure. Before any trip longer than a quick run to the local ramp, perform a walkaround with lights on, check tire pressure, confirm bearing temperature after the first few miles, and verify that safety chains and breakaway components are not rubbing the wiring harness.
Common mistakes and when professional help makes sense
The biggest mistakes I see are assuming the frame is a sufficient ground everywhere, using non-sealed crimp connectors, mixing connector standards without testing, and replacing visible parts while ignoring hidden corrosion upstream. Another common error is diagnosing by guesswork instead of by circuit. Owners swap bulbs, then lenses, then plugs, and eventually discover the issue was a broken brown wire inside loom near a rusty clamp. Methodical testing saves money. It also prevents introducing new faults, such as reversed left and right turn signals or a brake circuit tied incorrectly into running lights through a poor adapter.
There are times to hand the job to a professional trailer shop or marine service technician. If the tow vehicle has integrated trailer modules, lamp-out detection, or converter-related issues, diagnosis can move beyond basic trailer wiring. The same is true when corrosion has spread into brake wiring, junction boxes, or actuator-mounted reverse lockout solenoids on surge-brake trailers. A shop can load-test circuits, inspect hidden damage, and confirm compliance with lighting requirements for your trailer’s width and use. That matters if you tow across state lines, haul at night regularly, or depend on the trailer for long highway runs where an intermittent light fault becomes a serious safety risk.
Inspecting and replacing boat trailer lights is one of the highest-value jobs in trailer maintenance and towing because it improves safety, reduces roadside interruptions, and prevents repeat electrical problems that often start small and spread. The process is simple when approached in order: test the tow vehicle and connector, inspect the harness, confirm power and ground, replace failed assemblies with sealed marine-grade components, and rewire completely when corrosion or poor past repairs make patching unreliable. In real use, durable results come from dedicated grounds, heat-shrink sealed connections, protected routing, and quality LED assemblies rather than quick fixes.
As the hub page for this subtopic, the key takeaway is that trailer lights are connected to every other towing concern. Wiring condition affects reliability on long trips. Secure routing affects durability over rough roads. Proper connectors affect compatibility between trailer and vehicle. Regular rinsing, inspection, and preseason testing reduce failures at the ramp and on the highway. Owners who treat lighting as part of a full trailer system, not a last-minute checkbox, spend less time troubleshooting and more time boating. If your trailer has not had a thorough light inspection recently, do one before the next tow and replace any weak link now, not after dark on the shoulder.
Frequently Asked Questions
What are the most common signs that boat trailer lights need inspection or replacement?
The most obvious warning sign is a light that does not work at all, but many trailer lighting problems start with smaller symptoms. You may notice one tail light is dimmer than the other, a turn signal flashes too fast, brake lights work intermittently, or side markers cut in and out when the trailer hits bumps. These are all clues that something in the lighting system is failing, whether that is the bulb, LED assembly, connector, ground, or wiring harness. Because boat trailers are routinely backed into water and exposed to road spray, corrosion is one of the most common root causes. Moisture can get into lamp housings, connector pins, splices, and grounding points, creating resistance that leads to weak or inconsistent performance.
It is also important to pay attention to physical damage. Cracked lenses, broken mounting studs, loose wiring, worn insulation, and rust around mounting points can all affect reliability. Even if the lights still function, these issues often lead to bigger failures later. In many cases, a trailer owner discovers a problem only after another driver points it out or after getting stopped for a nonworking brake light. That is why a quick pre-trip light check is so valuable. If your boat trailer lights look cloudy, flicker, fail after launching, or stop working in wet conditions, it is time for a full inspection rather than just replacing one bulb and hoping for the best.
How do you inspect boat trailer lights and wiring step by step?
Start with the tow vehicle and trailer connected on level ground. Plug the trailer connector into the vehicle socket and test each function one at a time: running lights, left turn, right turn, and brake lights. If possible, have another person operate the vehicle controls while you walk around the trailer. Confirm that both sides respond correctly and that side markers and clearance lights illuminate as expected. If one function fails on multiple lights, the problem may be at the connector, fuse, or shared ground. If only one lamp fails, the issue is more likely local to that fixture or its wiring.
Next, inspect the connector closely. Look for bent pins, green or white corrosion, looseness, broken plastic, or water intrusion. Clean dirty terminals with electrical contact cleaner and a small brush. Then trace the trailer harness from the tongue to the rear of the trailer. Check for pinched wires, rubbed insulation, hanging sections, poor splices, cracked heat shrink, and places where the harness can chafe against the frame. On boat trailers, pay special attention to areas near bunk brackets, axle mounts, and frame holes where vibration and movement often damage wiring over time.
After that, inspect each light assembly. Remove the lens if applicable and look for moisture, rust, burned bulb sockets, or corroded contacts. If your trailer uses incandescent lights, check the bulbs for broken filaments or darkened glass. If it uses sealed LED units, a failed diode or water intrusion usually means replacing the entire assembly. Also inspect the mounting hardware and the grounding method. Many trailer lights ground through their mounting studs to the trailer frame, and rust or paint at that connection can interrupt the ground path. Using a multimeter or test light can help confirm whether power is reaching the light and whether the ground is solid. A complete inspection always includes both the power side and the ground side, because a bad ground can mimic many other electrical problems.
What tools and parts are needed to replace boat trailer lights correctly?
For a straightforward replacement, it helps to have a few basic tools and trailer-rated electrical parts ready before you begin. Common tools include screwdrivers, a socket or nut driver set, wire strippers, crimpers, heat gun, multimeter or test light, electrical contact cleaner, and dielectric grease. If old mounting hardware is badly rusted, penetrating oil can save time. For wiring repairs, marine-grade heat-shrink butt connectors are strongly recommended because they seal out moisture far better than standard automotive connectors. On a boat trailer, that extra protection matters.
For parts, choose submersible trailer lights designed for wet service. LED lights are often the best upgrade because they are brighter, longer-lasting, and less vulnerable to bulb failure from vibration. You may need complete tail light assemblies, side marker lights, replacement reflectors, a trailer wiring harness, ring terminals for ground connections, and a new vehicle-side or trailer-side plug if the existing connector is corroded or damaged. Match the replacement parts to your trailer’s connector type, voltage, and lighting configuration. Also make sure the lights meet road-legal requirements for your trailer’s width and use. If the harness insulation is brittle or several splices are already failing, replacing the whole harness instead of patching section after section is often the smarter and more reliable choice.
How do you replace boat trailer lights and make sure the new installation is waterproof and reliable?
Begin by disconnecting the trailer from power and removing the failed light assembly. Take note of how the old wiring is routed and connected before cutting anything loose. If the existing wiring colors are faded or nonstandard, label the wires as you go. Remove corrosion from the mounting area and inspect the frame or bracket where the new light will attach. If the light relies on the mounting hardware for ground, clean the metal surface to bare metal where needed so the connection is solid. If possible, a dedicated ground wire run back through the harness is even better, because it reduces dependence on the trailer frame and often improves long-term reliability.
Install the new light using stainless or corrosion-resistant hardware when possible. Make your wire connections with heat-shrink marine-grade connectors, and heat them fully so the adhesive seals the joint. Avoid twisting wires together and wrapping them with standard tape alone, since that type of repair tends to fail quickly in wet, high-vibration trailer service. Route the wiring so it is supported, protected from abrasion, and kept away from sharp edges or moving components. Use wire loom, clips, or cable ties where appropriate, but do not cinch ties so tightly that they damage the insulation.
After installation, apply dielectric grease to the connector pins and any serviceable bulb contacts, then test every function again before towing. Check the lights with the trailer connected and gently move the harness by hand to confirm there are no intermittent faults. If everything works consistently, the final step is making sure the lights are mounted securely and aimed properly so they are visible from the rear and sides. A reliable boat trailer lighting repair is not just about getting the bulbs to come on once; it is about creating sealed, corrosion-resistant connections and stable wiring that will keep working after repeated launches, rain, vibration, and highway use.
Is it better to repair one bad light, or replace the entire boat trailer lighting system?
That depends on the age and condition of the trailer, but in many cases a full system replacement is the better long-term value. If a single bulb burned out in an otherwise clean, modern, well-sealed setup, a simple light replacement may be all you need. The same goes for an isolated cracked lens or one damaged side marker. However, if the trailer has multiple intermittent problems, visible corrosion, brittle wiring, repeated ground issues, or an old harness with several patched sections, replacing only one component can turn into a cycle of ongoing repairs. Boat trailers live in a harsh environment, and once corrosion begins affecting several parts of the system, failures tend to spread.
Upgrading the full setup to a new harness and sealed LED lights can improve reliability, brightness, and maintenance intervals. It also gives you the chance to correct poor routing, eliminate weak splices, replace the connector, and establish a better ground strategy. For trailer owners who tow frequently, travel at night, or launch in saltwater, a complete refresh often makes more sense than chasing one issue after another. The key is to think of trailer lights as one connected system rather than a collection of separate parts. If one part has failed because of water intrusion, corrosion, or wiring decay, the surrounding components may not be far behind. Replacing the system as a whole can save time, reduce roadside problems, and give you much more confidence every time you tow.